Sunday, 15 April 2018

Monday, 9 April 2018
Monday, 19 March 2018
Get Email for Customer / Vendor (with specific roles)
To get an email address for a customer or vendor, you can use the following statement
static void Cust_emailStmtjob(Args _args)
{
CustTable cust; //Replace with vendTable for Vendors
DirPartyLocation dirPartyLocation;
LogisticsElectronicAddress elecAddress;
LogisticsElectronicAddressRole elecAddressRole;
LogisticsLocationRole locRole;
select firstOnly cust
where cust.AccountNum == 'us-001';
while select DirPartyLocation
where dirPartyLocation.party == cust.Party
{
while select elecAddress
where elecAddress.Location == dirPartyLocation.Location
&& elecAddress.Type == LogisticsElectronicAddressMethodType::Email
{
while select elecAddressRole
where elecAddressRole.ElectronicAddress == elecAddress.RecId
join locRole
where locRole.RecId == elecAddressRole.LocationRole
&& locRole.Name == "Invoice"
{
info(strFmt("%1 - %2", elecAddress.Locator, locRole.Name));
}
}
}
}
static void Cust_emailStmtjob(Args _args)
{
CustTable cust; //Replace with vendTable for Vendors
DirPartyLocation dirPartyLocation;
LogisticsElectronicAddress elecAddress;
LogisticsElectronicAddressRole elecAddressRole;
LogisticsLocationRole locRole;
select firstOnly cust
where cust.AccountNum == 'us-001';
while select DirPartyLocation
where dirPartyLocation.party == cust.Party
{
while select elecAddress
where elecAddress.Location == dirPartyLocation.Location
&& elecAddress.Type == LogisticsElectronicAddressMethodType::Email
{
while select elecAddressRole
where elecAddressRole.ElectronicAddress == elecAddress.RecId
join locRole
where locRole.RecId == elecAddressRole.LocationRole
&& locRole.Name == "Invoice"
{
info(strFmt("%1 - %2", elecAddress.Locator, locRole.Name));
}
}
}
}
Add field on Purchase order confirmation report
Add field on Purchase order confirmation report
There is requirement to add field on PO lines and same for the
confirmation report. It’s not the straight away to add field on the report. It
requires to add field on other objects (table/view/query).
On PurchPurchaseOrderreport
it uses the PurchLineALLVersionsview
to get the details of the PO on the PurchPurchaseOrderDP. So follow the below
steps to add field on PurchLineAllVersions view.

- Add field on the PurchLine Table
- Add field on the PurchLineHistory Table
- Now, Refresh or Restore the queries used for PurchLineArchivedVersions and PurchLineNotArchivedVersions as this have dynamics field property to “Yes” our new fields should be added automatically on this queries and Verify the field is added on the query.
- Now, Restore the views PurchLineArchivedVersions and PurchLineNotArchivedVersions( if you want add field on the views)
- Add field on PurchLineAllVersion, here you have to add field manually as the dynamics field property is set.
- That’s it, now use the field on the PurchPurchaseOrderDP to have on report. You also have to add field on tmp table.
Friday, 23 February 2018
Export data from AX to XML file
Class Declaration:
class CustomerExportXML
{
}
Main Method:
public static void main(Args _args)
{
XmlDocument doc;
XmlElement nodexml;
XmlElement nodeTable;
XmlElement nodeAccountNum;
XmlElement nodeCustGroupId;
XmlElement nodeName;
CustTable custTable;
DirPartyTable dirPartyTable;
DirParty dirParty;
MethodInfo methodInfo;
#define.filename(@'D:\Temp\TestXML.xml')
doc = XmlDocument::newBlank();
nodexml = doc.createElement('xml');
doc.appendChild(nodexml);
while select party, AccountNum, CustGroup from custTable join dirPartyTable
//where custTable.party == DirPartyTable.RecId
{
nodeTable = doc.createElement(tableStr(CustTable));
nodeTable.setAttribute(fieldStr(CustTable, RecId),int642str(custTable.RecId));
nodexml.appendChild(nodeTable);
nodeAccountNum = doc.createElement(fieldStr(CustTable, AccountNum));
nodeAccountNum.appendChild(doc.createTextNode(custTable.AccountNum));
nodeTable.appendChild(nodeAccountNum);
nodeCustGroupId = doc.createElement(fieldStr(CustTable, CustGroup));
nodeCustGroupId.appendChild(doc.createTextNode(custTable.CustGroup));
nodeTable.appendChild(nodeCustGroupId);
Commented Line Starts
//nodeName = doc.createElement(fieldStr(dirPartyTable, Name));
//nodeName.appendChild(doc.createTextNode(custTable.name()));
//nodeTable.appendChild(nodeName);
Commented Line Ends
nodeName = doc.createElement("Name");
nodeName.appendChild(doc.createTextNode(CustTable.name()));
nodeTable.appendChild(nodeName);
}
doc.save(#filename);
info(strFmt("File %1 created.", #filename));
}
class CustomerExportXML
{
}
Main Method:
public static void main(Args _args)
{
XmlDocument doc;
XmlElement nodexml;
XmlElement nodeTable;
XmlElement nodeAccountNum;
XmlElement nodeCustGroupId;
XmlElement nodeName;
CustTable custTable;
DirPartyTable dirPartyTable;
DirParty dirParty;
MethodInfo methodInfo;
#define.filename(@'D:\Temp\TestXML.xml')
doc = XmlDocument::newBlank();
nodexml = doc.createElement('xml');
doc.appendChild(nodexml);
while select party, AccountNum, CustGroup from custTable join dirPartyTable
//where custTable.party == DirPartyTable.RecId
{
nodeTable = doc.createElement(tableStr(CustTable));
nodeTable.setAttribute(fieldStr(CustTable, RecId),int642str(custTable.RecId));
nodexml.appendChild(nodeTable);
nodeAccountNum = doc.createElement(fieldStr(CustTable, AccountNum));
nodeAccountNum.appendChild(doc.createTextNode(custTable.AccountNum));
nodeTable.appendChild(nodeAccountNum);
nodeCustGroupId = doc.createElement(fieldStr(CustTable, CustGroup));
nodeCustGroupId.appendChild(doc.createTextNode(custTable.CustGroup));
nodeTable.appendChild(nodeCustGroupId);
Commented Line Starts
//nodeName = doc.createElement(fieldStr(dirPartyTable, Name));
//nodeName.appendChild(doc.createTextNode(custTable.name()));
//nodeTable.appendChild(nodeName);
Commented Line Ends
nodeName = doc.createElement("Name");
nodeName.appendChild(doc.createTextNode(CustTable.name()));
nodeTable.appendChild(nodeName);
}
doc.save(#filename);
info(strFmt("File %1 created.", #filename));
}
Thursday, 15 February 2018
Creating a applicant through job X++
static void CreateAplicant(Args _args)
{
HcmApplicant hcmApplicant;
DirPerson dirperson;
DirPersonName dirPersonName;
NumberSeq sequence;
HcmApplicantId applicantId;
RecId person, dirPersonRecid;
DirPartyRecId partyRecId;
Name personName;
personName = "Krishna" +" " +"kumar"+ " " + "test";
partyRecId = DirPartyTable::createNew( DirPartyType::Person, personName).RecId;
dirPersonRecId = DirPerson::find(partyRecId).RecId;
dirPersonName.FirstName = "Krishna";
dirPersonName.MiddleName = "kumar";
dirPersonName.LastName = "test";
dirPersonName.Person = dirPersonRecId;
if (dirPersonName.validateWrite())
{
dirPersonName.insert();
}
ttsbegin;
applicantId = NumberSeq::newGetNum( HRMParameters::numRefApplicantId()).num();
ttscommit;
hcmApplicant.ApplicantId = applicantId;
if(dirPersonRecId != hcmApplicant.Person)
{
hcmApplicant.Person = dirPersonRecId;
hcmApplicant.insert();
}
}
{
HcmApplicant hcmApplicant;
DirPerson dirperson;
DirPersonName dirPersonName;
NumberSeq sequence;
HcmApplicantId applicantId;
RecId person, dirPersonRecid;
DirPartyRecId partyRecId;
Name personName;
personName = "Krishna" +" " +"kumar"+ " " + "test";
partyRecId = DirPartyTable::createNew( DirPartyType::Person, personName).RecId;
dirPersonRecId = DirPerson::find(partyRecId).RecId;
dirPersonName.FirstName = "Krishna";
dirPersonName.MiddleName = "kumar";
dirPersonName.LastName = "test";
dirPersonName.Person = dirPersonRecId;
if (dirPersonName.validateWrite())
{
dirPersonName.insert();
}
ttsbegin;
applicantId = NumberSeq::newGetNum( HRMParameters::numRefApplicantId()).num();
ttscommit;
hcmApplicant.ApplicantId = applicantId;
if(dirPersonRecId != hcmApplicant.Person)
{
hcmApplicant.Person = dirPersonRecId;
hcmApplicant.insert();
}
}
Tuesday, 20 June 2017
Import the data from Excel to D365/Ax7
using System.IO;
using OfficeOpenXml;
using OfficeOpenXml.ExcelPackage;
using OfficeOpenXml.ExcelRange;
class RunnableClass1
{
/// <summary>
/// Runs the class with the specified arguments.
/// </summary>
/// <param name = "_args">The specified arguments.</param>
public static void main(Args _args)
{
System.IO.Stream stream;
ExcelSpreadsheetName sheeet;
FileUploadBuild fileUpload;
DialogGroup dlgUploadGroup;
FileUploadBuild fileUploadBuild;
FormBuildControl formBuildControl;
TableTest test;
Dialog dialog = new Dialog("Import the data from Excel");
dlgUploadGroup = dialog.addGroup("@SYS54759");
formBuildControl = dialog.formBuildDesign().control(dlgUploadGroup.name());
fileUploadBuild = formBuildControl.addControlEx(classstr(FileUpload), 'Upload');
fileUploadBuild.style(FileUploadStyle::MinimalWithFilename);
fileUploadBuild.fileTypesAccepted('.xlsx');
if (dialog.run() && dialog.closedOk())
{
FileUpload fileUploadControl = dialog.formRun().control(dialog.formRun().controlId('Upload'));
FileUploadTemporaryStorageResult fileUploadResult = fileUploadControl.getFileUploadResult();
if (fileUploadResult != null && fileUploadResult.getUploadStatus())
{
stream = fileUploadResult.openResult();
using (ExcelPackage Package = new ExcelPackage(stream))
{
int rowCount, i;
Package.Load(stream);
ExcelWorksheet worksheet = package.get_Workbook().get_Worksheets().get_Item(1);
OfficeOpenXml.ExcelRange range = worksheet.Cells;
rowCount = (worksheet.Dimension.End.Row) - (worksheet.Dimension.Start.Row) + 1;
//rowCount = 1;
//i=Range.Rows;
for (i = 2; i<= rowCount; i++)
{
test.AccountNum = range.get_Item(i, 1).value;
test.AccountName = range.get_Item(i, 2).value;
test.insert();
}
}
}
else
{
error("Error ");
}
info("Done");
}
}
}
using OfficeOpenXml;
using OfficeOpenXml.ExcelPackage;
using OfficeOpenXml.ExcelRange;
class RunnableClass1
{
/// <summary>
/// Runs the class with the specified arguments.
/// </summary>
/// <param name = "_args">The specified arguments.</param>
public static void main(Args _args)
{
System.IO.Stream stream;
ExcelSpreadsheetName sheeet;
FileUploadBuild fileUpload;
DialogGroup dlgUploadGroup;
FileUploadBuild fileUploadBuild;
FormBuildControl formBuildControl;
TableTest test;
Dialog dialog = new Dialog("Import the data from Excel");
dlgUploadGroup = dialog.addGroup("@SYS54759");
formBuildControl = dialog.formBuildDesign().control(dlgUploadGroup.name());
fileUploadBuild = formBuildControl.addControlEx(classstr(FileUpload), 'Upload');
fileUploadBuild.style(FileUploadStyle::MinimalWithFilename);
fileUploadBuild.fileTypesAccepted('.xlsx');
if (dialog.run() && dialog.closedOk())
{
FileUpload fileUploadControl = dialog.formRun().control(dialog.formRun().controlId('Upload'));
FileUploadTemporaryStorageResult fileUploadResult = fileUploadControl.getFileUploadResult();
if (fileUploadResult != null && fileUploadResult.getUploadStatus())
{
stream = fileUploadResult.openResult();
using (ExcelPackage Package = new ExcelPackage(stream))
{
int rowCount, i;
Package.Load(stream);
ExcelWorksheet worksheet = package.get_Workbook().get_Worksheets().get_Item(1);
OfficeOpenXml.ExcelRange range = worksheet.Cells;
rowCount = (worksheet.Dimension.End.Row) - (worksheet.Dimension.Start.Row) + 1;
//rowCount = 1;
//i=Range.Rows;
for (i = 2; i<= rowCount; i++)
{
test.AccountNum = range.get_Item(i, 1).value;
test.AccountName = range.get_Item(i, 2).value;
test.insert();
}
}
}
else
{
error("Error ");
}
info("Done");
}
}
}
Friday, 16 June 2017
Design Permissions for Fields in a Table
You can use the AOT to design permissions for the fields in a table. By changing the EffectiveAccess property in permissions for each of the fields you can control the application user access to those fields. For example, you can control whether the application user can view or edit some of the fields on a form based on the security role assigned to the application user.
Prerequisites
To understand this walkthrough topic, you first need to understand the following areas:
- Walkthrough: Design Permissions for a Form that is Started from a Menu Item
You must understand how to add a menu item under AOT > Security > Privileges > YourPrivilege > Entry Points. - Automatic Inference of Permissions in AOT Security
When you set security property values under AOT > Security > Privilege, you need to understand what those values refer to elsewhere in the AOT.
Preliminary Environment
This topic assumes that several AOT items already exist, or that you can imagine them. The items are as follows:
- Table – Person table, with fields City, Name, and Zip.
- Form – FieldsForm form.
- Data source – Person table as the data source for FieldsForm form.
- Menu – Home > Common menu, which might already exist.
- Menu Item – FieldsMenuItem menu item, with its ObjectType property set to Form, and its Object property set to FieldsForm.
- Security > Privilege – TestFieldPrivilege privilege.
- Privilege > TestFieldPrivilege > Entry Point – FieldsMenuItem, with its ObjectType property set to MenuItemDisplay.
You can test with different values for the AccessLevel property, but start with Update.
The following image displays a project that contains almost everything in the preceding list. In the next section you create the node AOT > Security > Privileges > Permissions > Tables > Person, and the field nodes under it.

The project that you create
Create Field Permissions
You can create field permissions for TestFieldPrivilege by following these steps:
Add the Person table to the TestFieldPrivilege privilege. Do this by dragging the node
AOT > Data Dictionary > Tables > Person
onto the node at
AOT > Security > Privileges > TestFormPrivilege > Permissions > Tables. TipDrag operations are easier when you have two AOT windows open. You can drag from one AOT to the other.
- On the new Person node, set the EffectiveAccess property to Update.
- At Data Dictionary > Tables > Person > Fields, highlight all fields and drag them onto the TestFieldPrivilege > Permissions > Tables > Person node.
- Set the EffectiveAccess property for each new field node as follows:
- City – Update
- Name – Read
- Zip – NoAccess
Tuesday, 30 May 2017
SSRS Report AX 2012 - The operation has timed out error message when you run a report in Microsoft Dynamics AX
About this problem, read below and test to find if this will have improved SSRS Report performance:
There is a process to change long running jobs so that they are run in a Pre-Processing way, so that all the data is prepared before the SSRS Report Window is started. This prevents the timeout problem, sometimes shown by the message ““A connection attempt failed because the connected party did not properly respond after a period of time, or established connection failed because connected host has failed to respond”To change the report to run in these pre-processing way ( Similar Sales confirmation, Sales Invoice, etc. reports ), see this example below for the Dimension Statement report on how to change this:
1. To find which object you need to modify, first look in the AOT > Menus, for the Menu where the report is
2. View the properties on this to see the associated menu item. You can see below the menu item is “LedgerDimensionTransStatement”.
3. Find this menu item in AOT > Menu Items > Output
…and look at the properties, make a note of the “LinkedPermissionObject”, in this case “LedgerTransStatement”
4. Next in the AOT > SSRS Reports > Reports, locate LedgerTransStatement, then expand this out until you see the Server Methods. Make a note of the Server Method class, in this case “LedgerTransStatementDP”
5. In the AOT > Classes, locate and open class LedgerTransStatementDP.
6. In the LedgerTransStatementDP\classDeclaration, change line 9 to extend SrsReportDataProviderPreProcess instead of SrsReportDataProviderBase
7. Make a note of the Temp table used in the report, as above this is LedgerTransStatementTmp.
8. Next, change the method LedgerTransStatementDP\processReport to add the following line after the contract (line 27):
ledgerTransStatementTmp.setConnection(this.parmUserConnection());
9. Next, in AOT > Data Dictionary > Tables, locate the table you made a note of in point 7, so in this case the LedgerTransStatementTmp. Change the table properties as follows:
· TableType = Regular
· CreatedBy = Yes
· CreatedTransactionId = Yes
10. Opened LedgerTransStatement.Detail report in Visual Studio and refreshed the data source to include new field (CreatedTransactionId).
11. Deployed the new LedgerTransStatement.Detail report.
12. In AX, did a Generate Incremental CIL.
13. Restart SSRS
Also, at this link
Microsoft Dynamics AX 2012 Reporting: How to run reports that executes longer than 10 minutes
The operation has timed out" error message when you run a report in Microsoft Dynamics AX 2012
AX 2012: Report timeout error
How To: Addressing SSRS Session Timeouts
you can find useful information about modify the SQL Reporting Send Timeout Parameter.
http://sinedax.blogspot.in/2012/11/ssrs-report-ax-2012-operation-has-timed.html
Sunday, 7 May 2017
Inserting Space between the characters in a String in Ax
Hi,
Today I would like to share you x++ code to insert space between the characters in a string in AX.
Example 1:


Today I would like to share you x++ code to insert space between the characters in a string in AX.
Example 1:
static void insertSpaceBtwString(Args _args)
{
str s,s1;
int i,j;
s="KORCOMPTENZ";
j= strLen(s);
for(i=1;i<=j;i++)
{
s1=s1+subStr(s,i,1);
if(i!=strLen(s))
s1=s1+ " ";
}
info(s1);
}
Output:
Example 2:
Inserting space after each four digit Number
static void InsertSpace(Args _args)
{
str s,s1;
int i,j;
s="1245678945612355";
j= strLen(s);
for(i=1;i<=j;i=i+4)
{
s1=s1+subStr(s,i,4);
if(i+4<=j)
s1=s1+" ";
}
info(s1);
}
Output:
Happy Daxing....
Tuesday, 4 April 2017
Publishing AX Reports – User or group name not recognized
You may encounter an issue with trying to release reports to your AX environment when you move databases between environments. The error you might receive, during the report release, is Publish_AXReport: The user or group name ‘xxx’ is not recognized
Even though everything is setup correctly in your AX environment, the error is caused by having additional records in the table SysServerSessions. If from SQL you review the data in this table you should notice that you have records that point to old servers/instances. You need to delete all the records that are not relevant to your current environment. Once done you should be able to deploy reports with getting the user or group name error.
Even though everything is setup correctly in your AX environment, the error is caused by having additional records in the table SysServerSessions. If from SQL you review the data in this table you should notice that you have records that point to old servers/instances. You need to delete all the records that are not relevant to your current environment. Once done you should be able to deploy reports with getting the user or group name error.
Wednesday, 15 March 2017
Server backup
How to schedule a SQL Server backup
Having a good backup and restore plan is an important part of a disaster recovery strategy. This article will describe 3 different solutions/approaches for creating a scheduled backup in SQL Server
As a part of a backup strategy several types of backup can be used together.
Backup types
- Full database backups include all database objects, system tables, data, and transactions that occur during the backup. Full database backups allow performing a complete restoration to a state before the backup is performed.
- Differential backups contain data that has changed since the last full backup was performed and transactions that occur during the backup process. A differential backup is used alongside with the last full database backup. After taking a differential backup, as it is taken after the last full backup all of the old differential backups become obsolete.
- Transaction log backups records all the transactions that have occurred on a database since the previous transaction log backup and then truncates the transaction log and then truncates a transaction log. A transaction log backup ensures database recovery to a specific point of time e.g. to a moment prior to data loss.
- File and filegroup backups option is most suitable for backing up very large databases. A file backup will contain all the data in one or more files or filegroups. A transaction log backup has also be performed to span all the file backups from start to finish when using file backups to restore a database.
- Copy-only backups are mostly used when it’s needed to backup a database without affecting the processes of backup and restore for a specific database. Functionality of a copy-only backup is the same as full database with a difference that a transaction log backup will backup all transactions since the last full backup is performed and ignore the existence of the copy backup, therefore a copy backup cannot be used as the basis for differential and transaction log backups.
Recommended backup strategy practices
Backup location
It is advisable that backups are not stored on the same location (physical drive) where database files are stored. In cases when a physical drive fails use the drive or a network location to perform restore. If a file location is not specified when creating a database SQL Server will store database files on the default database locations.
Note that changing the default locations won’t move the current data and log files to a new location. This will only be applicable to databases created after this change.
Scheduled and automated backups
To prevent and backup safety and reliability is to set up (automate) the backup process through the means of schedules. Creating backup schedules is important as the time passes current backups get obsolete and out of time.
Keep yourself protected and be sure that you always have at hand a way to reestablish your data up until the point where the database failed. Scheduled backups provide an accurate data history.
The specified frequency of a backup depends on the company business needs etc., and is defined by Recovery Point Objective (RPO). For example, if an organization’s Service Level Agreement (SLA) specifies that no more than an hour’s data can be lost from a database, the RPO is one hour.
Test backups
Backup and recovery strategy cannot be complete until backups are successfully restored on a test server and verified that backup can be restored to fulfill all the requirements and conditions including all the combinations that the recovery strategy requires. There is a variety of factors to consider such as: the organizations requirements regarding the usage of data, protection etc.
Backup verification
Verifying backup ensures that a backup is created correctly, intact physically, that all the files in the backup are readable and can be restored in the event that the user needs to use it, and that all the transactions are consistent. It is important to understand that verifying a backup does not verify the structure of the data on the backup. However, if the backup was created using WITH CHECKSUMS, verifying the backup using WITH CHECKSUMS can provide a good indication of the reliability of the data on the backup.
By using T-SQL:
Including the CHECKSUM statement ensures consistency of data on the backup destination. To include CHECKSUM use the following query:
BACKUP DATABASE [AdventureWorks2012]
TO  DISK = N'F:\Backup\AW12.bak'
WITH CHECKSUM;
SQL Server Management Studio also provides options to include backup verification a CHECKSUM check when creating a backup as a task:

The Verify backup when finished option and Perform checksum before writing to media are used as an insurance that both backup and its data are consistent.
We will also show how to include verifications when scheduling backups.
In this article we will create a SQL Server scheduled backup by using a SQL Server Agent job, SQL Server Maintenance Plans, and ApexSQL Backup.
Create a SQL Server scheduled backup by using a SQL Server Agent job
To automate and schedule a backup with SQL Server Agent:
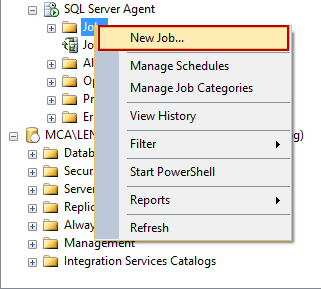
- In the Object Explorer pane, under the SQL Server Agent node, right click Jobs and select New job from the context menu:
- In the New Job dialog enter a job’s name
- Under the Steps tab click on the New button and create a backup step by inserting a T-SQL statement. In this case the CHECKSUM clause has to be included in T-SQL code:
USE AdventureWorks2012
GO
BACKUP DATABASE [AdventureWorks2012]
TO  DISK = N'F:\Backup\AW12.bak'
WITH CHECKSUM;
To create a differential backup use the following T-SQL script:USE AdventureWorks2012 GO BACKUP DATABASE [AdventureWorks2012] TO DISK = N'F:\Backup\AW12.bak' WITH CHECKSUM; BACKUP DATABASE [AdventureWorks2012] TO DISK = N'F:\Backup\AWD12.bak' WITH DIFFERENTIAL; WITH CHECKSUM; GOTo backup transaction log use the following script:BACKUP LOG [AdventureWorks2012] TO DISK = N'F:\Logs\AWD12.log'; GONote: To create a differential or a transaction log SQL Server database backup a full database backup has to exist. If a desired database has never been backed up, before creating differential backups, first create a full database backup. Differential and transaction log backups can be used along a full database backup. For example, a full backup can be scheduled every 24 hours, a differential backup can be performed every 5 hours, and a transaction log backup every 15 minutes.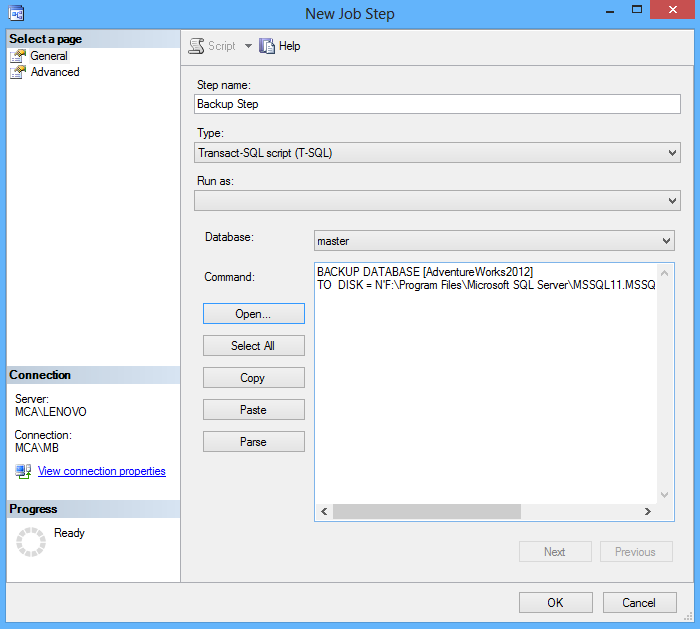
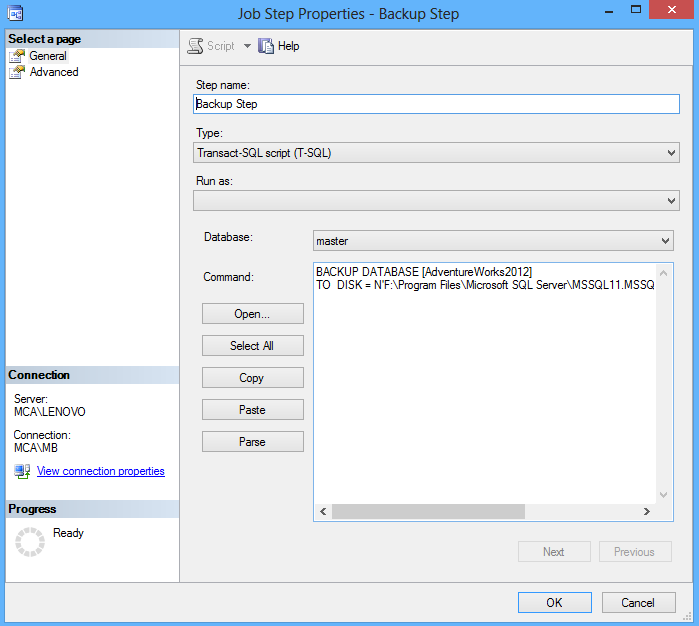
- Click ok to add a step, and click OK to create a job:
- To schedule a job, in the New Job dialog, under the Schedule tab click New.
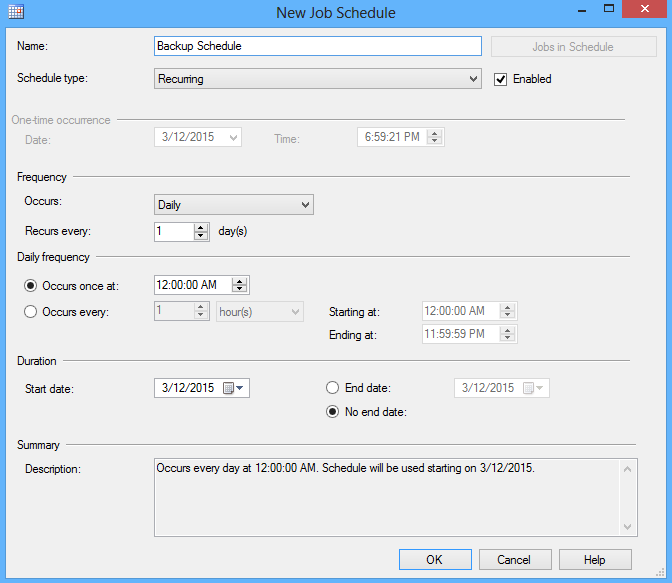
- In the Job Schedule select an occurring frequency and a start date and click OK:
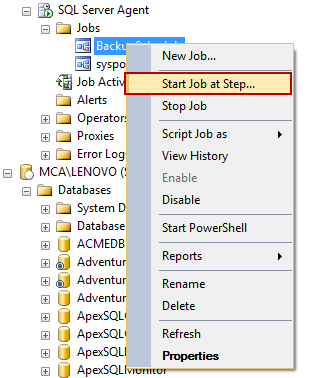
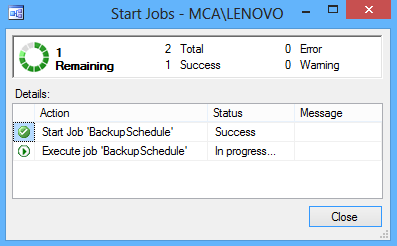
To check a created job in the Object Explorer pane and under the SQL Server Agent ➜ Jobs node right click the job create above and select the Start job at step option:
To use SQL Server Agent for backing up all databases under one instance there are two approaches, both of which require some manual work. One approach is to create a SSIS package using the Backup Database Task option from the SSIS toolbar and create a SQL Server Agent job to schedule it.
The other approach is to write a T-SQL script to backup all databases in the SQL Server Agent Job Step dialog.
Create a SQL Server scheduled backup by using SQL Server Maintenance Plans
There are two options to create a scheduled backup task by using SQL Server Maintenance Plans: manually by creating a new plan and by using the Maintenance Plan Wizard.
To manually create a scheduled backup task:
- In the Object Explorer pane under the Management node right click Maintenance Plans and select the New Maintenance Plan option:

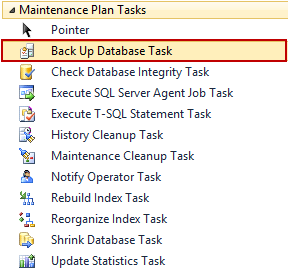
- From the Maintenance Plan Tasks toolbox select Back Up Database Task:
 The Maintenance Plan Wizard also provides the Check database integrity task that can be included in Maintenance Plan: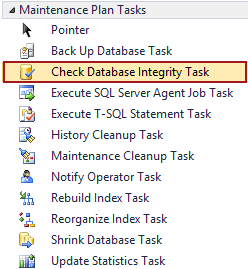
- Double click on an added plan and set backup options:
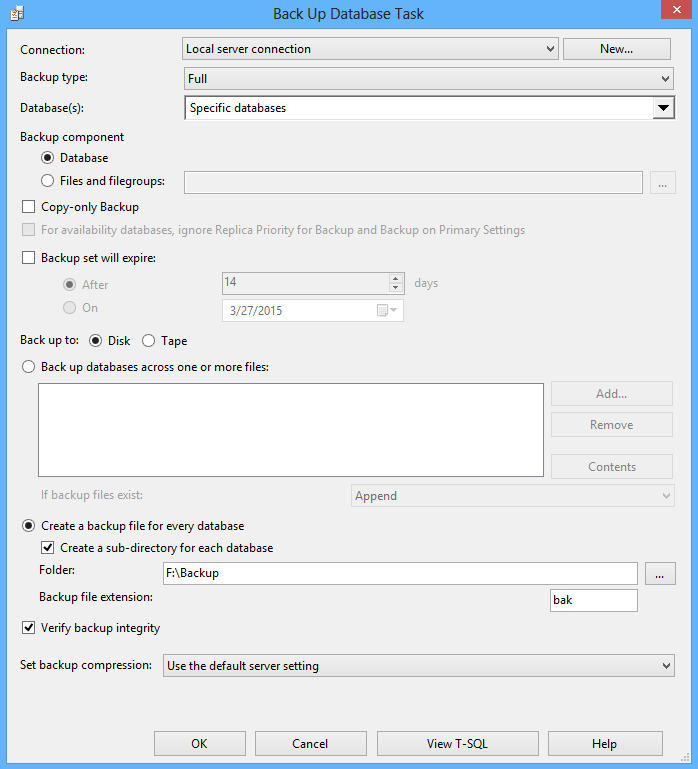
- To schedule a SQL Server Agent job use the Sub plan scheduling option.
- When a plan is created click save and this action will create a corresponding job under the SQL Server Agent ➜ Jobs folder.
A method to create a new maintenance plan through the Maintenance Plan Wizard guides the user through the process, but this option provides fewer options for fine tuning.
To automate and schedule a backup by using the SQL Server Maintenance Plan Wizard:
- In the Object Explorer pane under the Management node right click Maintenance Plans and select the Maintenance Plan Wizard option:
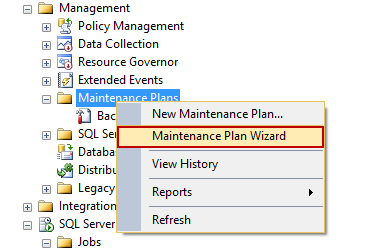
- In the Select Plan Properties window specify a plan name. To schedule a SQL Server Agent job click the Change button:
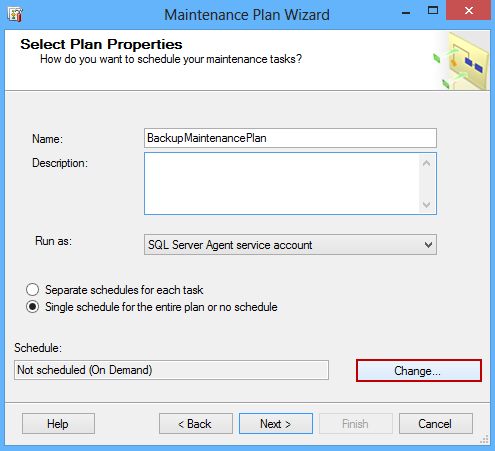
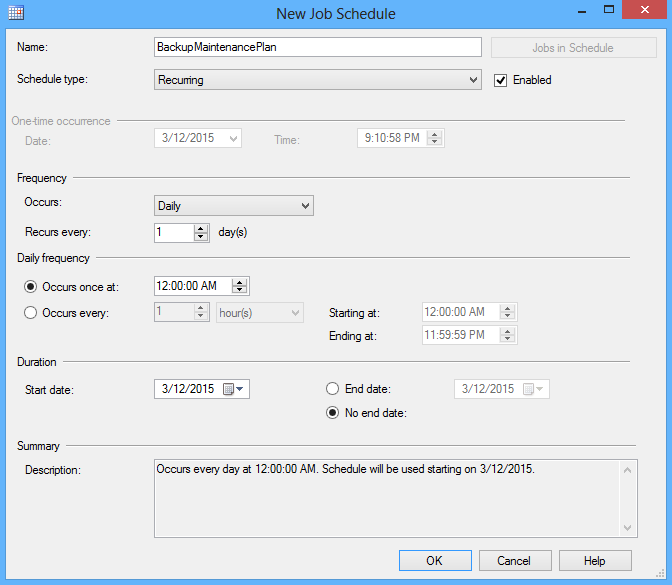
- In the Select Maintenance Plan Tasks select the Back Up Database option and the Check data integrity option. The check data integrity tack performs internal consistency check of the data and index pages within the database :
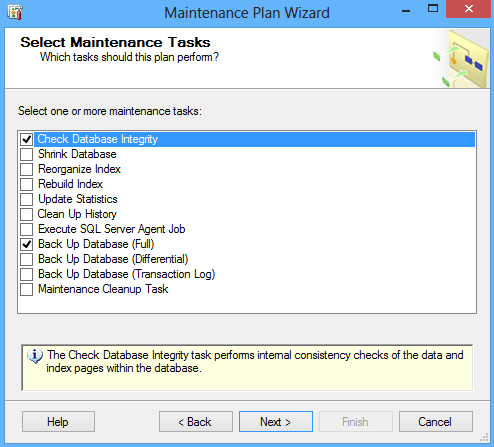
- In the following window configure the maintenance task by specifying a database for backup and the backup options. In the Define Back Up Database Task window also check the Verify backup integrity option:
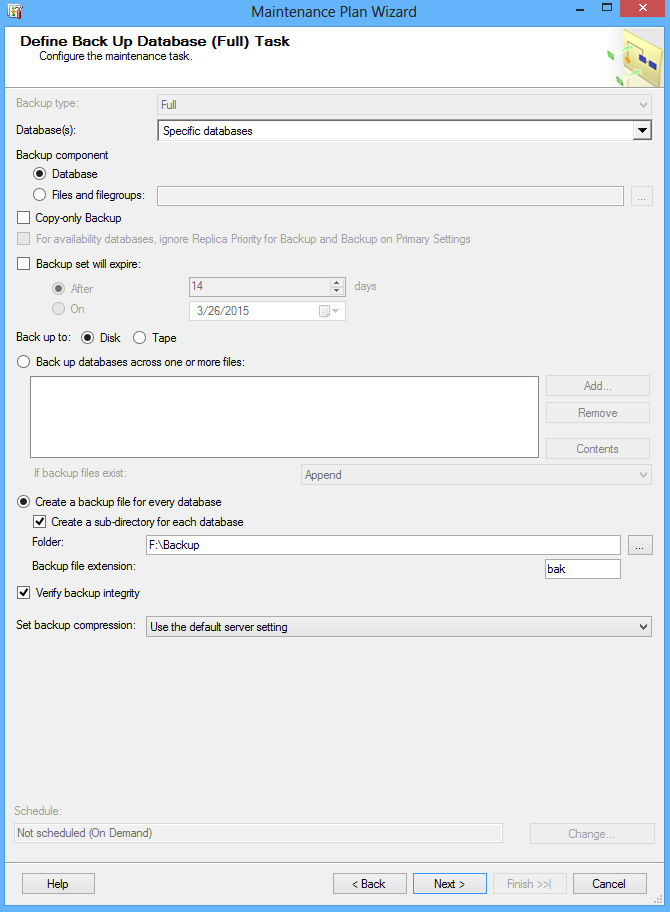
- After verifying the choices and actions click Finish:
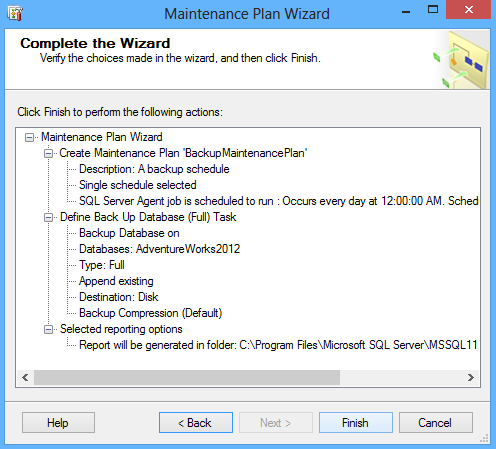
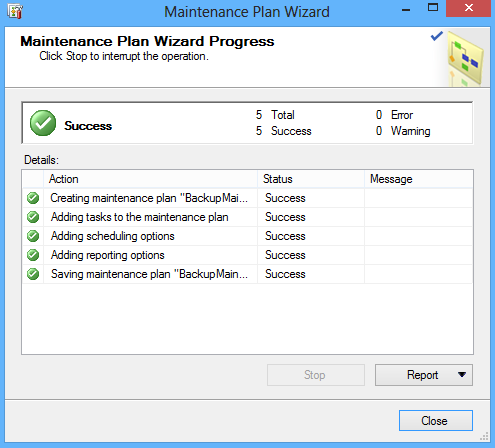
Maintenance Plans are more suitable for less experienced DBAs because they provide an easy to use GUI, and do not require manually written maintenance scripts. The downside of Maintenance Plans is that the tasks that Maintenance Plans provide are basic and don’t leave space for customization.
A Maintenance Plan is also atomic and is therefore not able to run multiple tasks. Each type of maintenance task within a single Maintenance Plan can only be configured to run once within that Plan. For example, if a task that is made to delete older backup files it will only delete one file type at a time. Because of this multiple Maintenance Plans have to be created just to perform a single task, in some cases, and every Maintenance Plan has to have a corresponding SQL Server Agent job to be scheduled.
Create a SQL Server scheduled backup by using ApexSQL Backup
As we saw when scheduling a SQL Server backup as a SQL Server Agent job we have to write a T-SQL script. Also, to fulfil the organizations SLA we would have to make two more jobs, one for a differential and one for a transaction log job.
To save time from having to write T-SQL scripts and eliminate the need to maintain both back up plans and their corresponding jobs when using SQL Server Maintenance Plans, a 3rd party tool, ApexSQL Backup, can be used.
ApexSQL Backup is a SQL Server backup manager that enables automating and scheduling SQL Server backup jobs in one task while preserving the backup chain for easy point-in-time restoration (database rollback).ApexSQL Backup is also able to run multiple tasks at the same time and provides an out of the box solution for scheduling a database backup for one or all databases in just a few clicks.
To create a SQL Server scheduled backup in ApexSQL Backup:
- In the Home tab of the main menu select the Backup option:

- In the Backup wizard specify a server name, a database name, and a backup type. ApexSQL Backup supports all backup types and provides an option to select all databases:
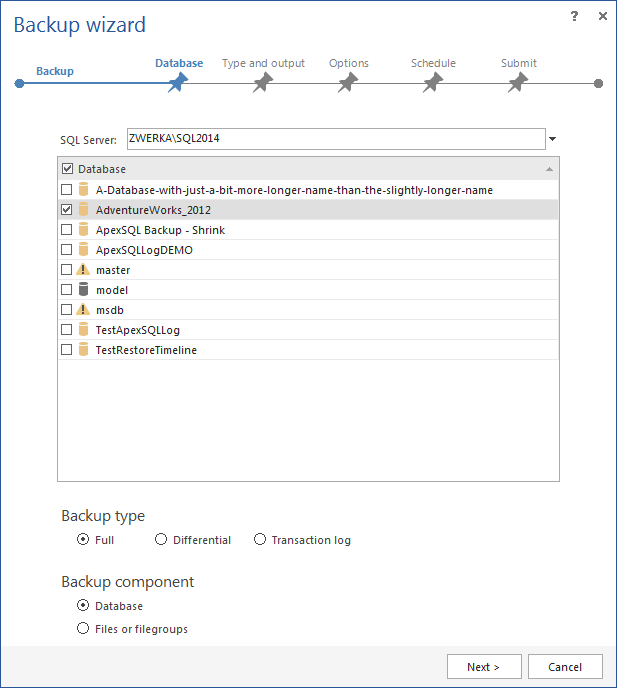
- In the Type and output window specify a destination folder and an output name:
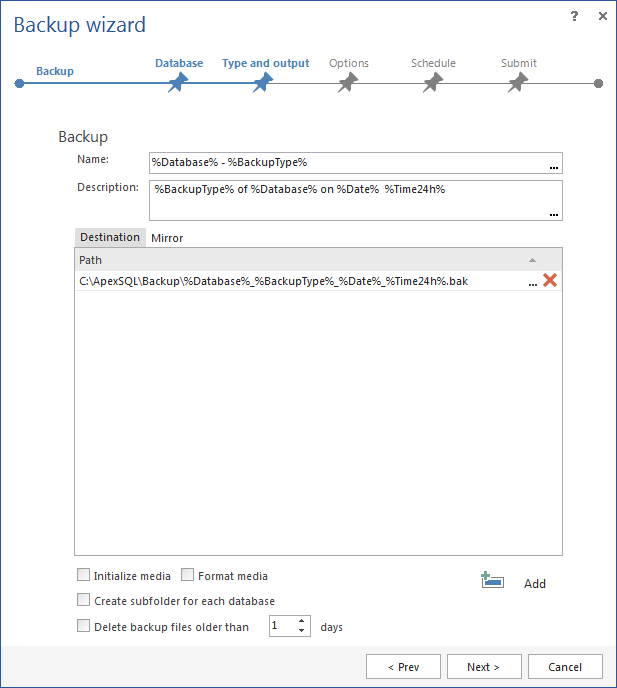
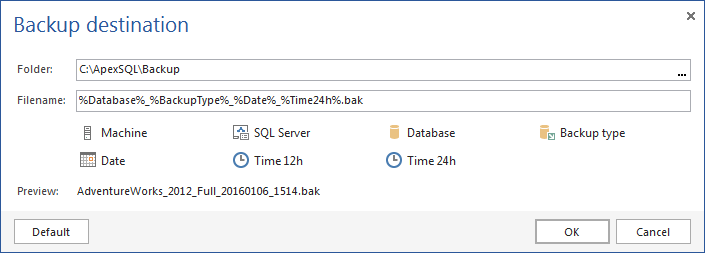
- In the Options window specify backup options such as backup verification, compression, encryption etc. ApexSQL Backup offers options to include both the Verify backup step when finished, and the Perform checksum step before writing to media option during the process of creating a backup task without the need for writing a separate script:
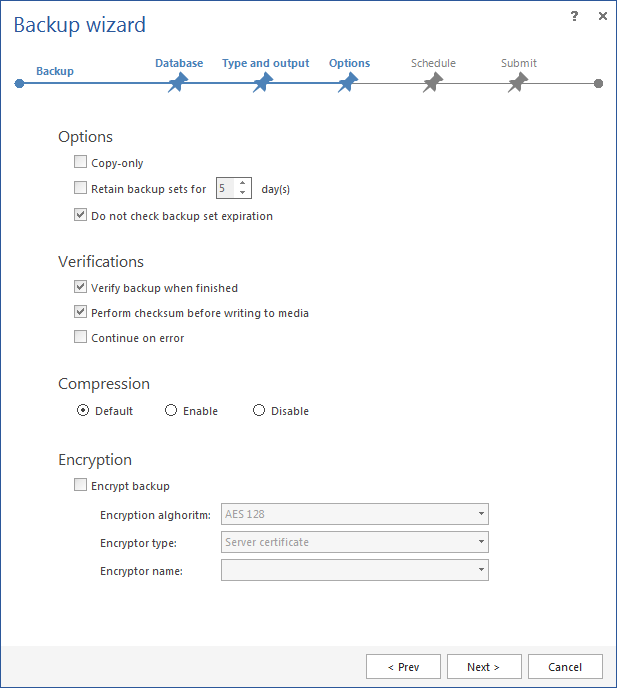
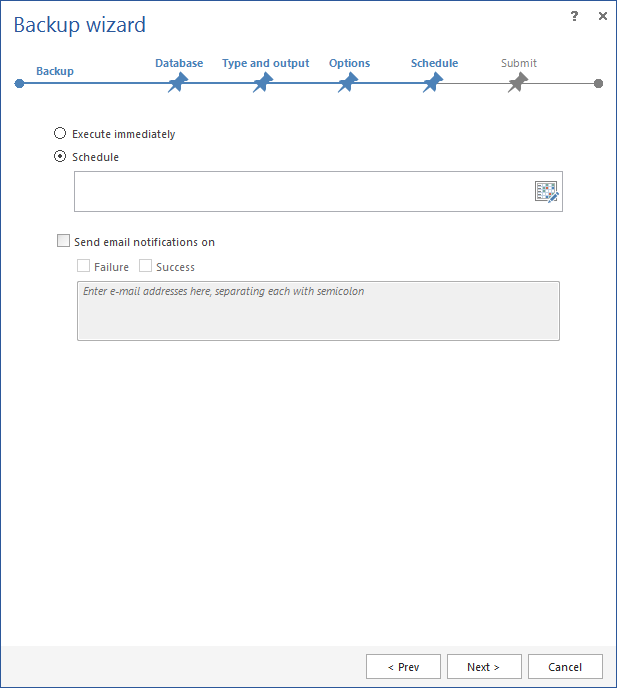
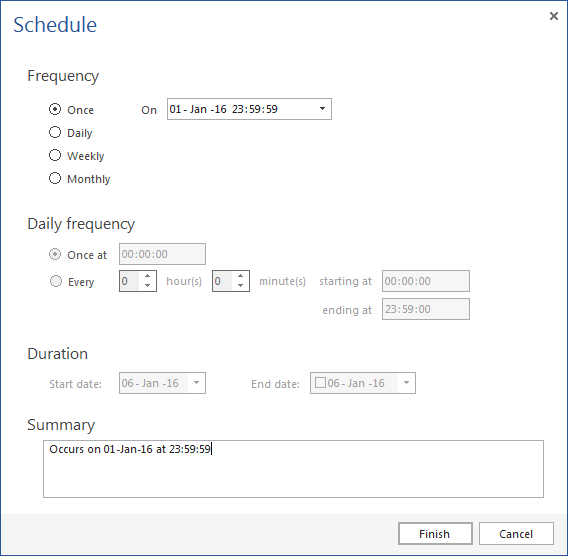
- In the following window select the Schedule option and specify the occurring frequency. ApexSQL Backup allows scheduling a backup task during the process of creating a task:
- Submit a scheduled backup.
Here’s a review of all three approaches to schedule a database backups:
SQL Server Agent
|
Maintenance Plans
|
ApexSQL Backup
| |
T-SQL script needed
|
Yes
|
No
|
No
|
Can backup all databases without a script
|
No
|
Yes
|
Yes
|
Can execute a task without an additional job
|
Yes
|
No
|
Yes
|
Can run multiple tasks at once
|
No
|
No
|
Yes
|
Useful resources:
Subscribe to:
Posts (Atom)