Monday, 30 November 2015


Friday, 27 November 2015
How to find one week& one month transactions in ax 2012
I want to find out last one week transactions in InventTrans form.
Override the executeQuery() in form data source.
public void executeQuery()
{
date fromdate = today()-7;
date todate = today();
this.query().dataSourceTable(tablenum(InventTrans)).addRange(fieldnum(InventTrans,DatePhysical)).value(queryRange(fromdate,todate));
}
I want to find out last one month transactions in CustTrans form
Override the executeQuery() in form data source.
public void executeQuery()
{
TransDate TransDate = today();
TransDate PresentMnth,PrevMnth;
PresentMnth = mkdate(dayOfMth(today()),mthofyr(TransDate),year(TransDate));
PrevMnth = mkDate(dayOfMth(today()),mthOfYr(TransDate)-1,year(TransDate));
//In order to get 2012 transactions we have to change this as
//PresentMnth = mkdate(dayOfMth(today()),mthofyr(TransDate),year(TransDate)-3);
// PrevMnth = mkDate(dayOfMth(today()),mthOfYr(TransDate)-1,year(TransDate)-3);
THIS.QUERY().DATASOURCETABLE(TABLENUM(CustTrans)).ADDRANGE(FIELDNUM(CustTrans,TransDate)).VALUE(QUERYRANGE(PrevMnth,PresentMnth));
}
Enable/Disable a
Financial dimension segment on AX Form:
Consider a scenario,
where we need to allow only those financial dimension segments to be edited on
the forms which are empty. Suppose, we are defaulting the Financial dimension
for Customer from Project record and we have a scenario to only allow those segments
to be edited which are not defaulted from Project and are empty. In standard
AX, we have the same scenario for Advanced Ledger Entry source document. Here,
I am going to explain that how we can achieve the similar functionality for
Customer master record in AX. Below are the detailed steps:
Step 1: Create a new
class extends from DimensionLinkProvider class
Following are the
details of the methods, you need to add:
In classDeclaration, add
the variables as shown below:

Override subscribed
method and return isSubscribed variable as shown below:

Override new method and
add the code shown below:

As you can see in the
above code, we need to check for CustTable record and call our local method to
add the logic for enable/disable individual dimension segment on the form. Now
we need to create a new method in order to be called from the new method
shown above. The new method will be used to call the delegate DimensionLinkAllowFieldEdit .
Code is shown below:

Now, override the
allowFieldEdit method. This method responds to a Dimension controller object
whenever a field is made editable for specific dimension attribute. Below is
the definition for the method:

Step 2: Add a reference
for CustTableDimensionLinkProvider class in DimensionLinkProviders class
Open the new method
of DimensionLinkProviders class and add the code as shown below. Note
the letter ‘s’ in class name, this is different from the class from which we
extend our new link provider class.

Now, if you open any
customer record from Accounts Receivable -> Common -> Customers, you can
see this in action as shown below:

Enable/Disable a
Financial dimension segment on created form:
Wednesday, 25 November 2015
Replacement groups in AX 2012
AX 2012 introduced a new type of form control called “Replacement group”. It’s very handy, nevertheless quite a few developers still don’t know about it or are not sure how to use it effectively.
This post is not going to details; the intention is rather to show something simple, though still from end to end.
Let’s say that we want to create a form showing released products. We create a form with InventTableas the data source and with a grid.
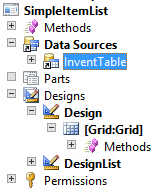
We’re especially interested in the Product field, so we drag it from the data source and drop it to the grid.

Notice that the type of the control is ReferenceGroup – we’ll talk about it very soon.
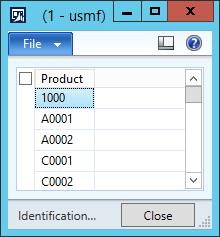
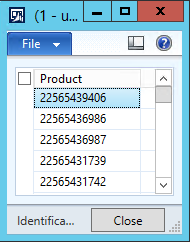
Without changing anything, we can run the form; it successfully displays product numbers:
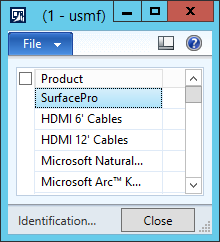
Let’s say that users insist on working with product names instead of product codes. Maybe they should have used a better convention for product codes, but that’s another topic. Now we have meet the request.
What should we do? Providing an edit method that would display names and find IDs from names specified by users? No, it’s much simpler with reference groups. Open properties of the reference group and change the value of ReplacementFieldGroup property from AutoIdentification toProductInformation:

Save the form and open it again – it now shows product names. It’s that simple!
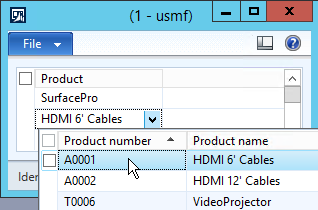
If the product was editable (which is not normally the case in InventTable), you would also get a lookup and would be able to select (or type) product names:
You could also override the lookup, if you don’t like the default one.
Now we should look more closely at how it works.
First of all, look at the Product field in InventTable. Its base type is Int64 and extended data type isEcoResProductRecId. Properties of the EDT shows that ReferenceTable = EcoResProduct, therefore the Product field contains record IDs of EcoResProduct table.
If we used the Int64Edit control to display the Product field, we would see just numbers, which wouldn’t be very useful.
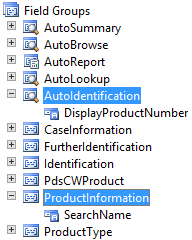
That’s why we have Reference group controls. The reference group in our form is bound to the Productfield (set in ReferenceField property), so that’s what gets saved to database. But we don’t display it to users – instead of that, we use a replacement field group. Field groups are defined on tables in AOT – here we can see the groups of EcoResProduct that we used in our example:
AX looks at the field (or even fields) contained in the field group and displays them instead of the record ID. If you change a value of the replacement field, AX finds the corresponding RecId and put it to the underlying field.
As you can see, reference groups allow you to change fields displayed to users by a simple property change. Also notice that it has zero effect to data stored in database – it still refers to a record ID.
There is one last thing I would like to mention, because it often confuses people. You may have a reference group for a worker showing the worker name (e.g. the Sales responsible person in Sales order form). The control uses the AutoIdentification field group of the HcmWorker table. The group contains a single field, Person, which is a RecId of DirPerson table. AutoIdentification group onDirPerson is empty, so where the name comes from? The trick is that DirPerson table inherits fromDirPartyTable, which contains the Name field in its AutoIdentification group. AX deals with all this complexity for you.
Purchase Order through Code:
static void CON_PO(Args _args)
{
NumberSeq numberseq;
PurchTable purchtable;
PurchLine purchline;
PurchFormLetter purchformletter;
InventDim inventdim;
NumberSequence numbersequence;
SysLastValue syslastvalue;
;
NumberSeq =NumberSeq::newGetNum(purchparameters::numRefPurchId(),true);
ttsBegin;
purchtable.initValue();
purchtable.PurchId = numberseq.num();
purchtable.OrderAccount = 'us-106';
purchtable.initFromVendTable();
if(!purchtable.validateWrite())
{
throw Exception::Error;
}
purchtable.insert();
purchline.PurchId = purchtable.PurchId;
purchline.ItemId = '1000';
purchline.initFromInventTable(InventTable::find(purchLine.ItemId));
purchline.PurchQty = 2;
purchline.PurchPrice = 200;
purchline.LineAmount = purchline.PurchQty*purchline.PurchPrice;
inventDim.InventSiteId = '1';
inventdim.InventLocationId = '11';
purchline.PurchStatus = PurchStatus::None;
purchline.PurchaseType = PurchaseType::Purch;
purchline.InventDimId = inventdim::findOrCreate(inventdim).inventDimId;
purchline.insert();
info(strFmt("purchase order %1 has been created",purchtable.PurchId));
ttsCommit;
}
------------------------------------------------------------------------------------------------------------------------
------------------------------------------------------------------------------------------------------------------------
static void CON_POAutoConfirmAndInvoice(Args _args)
{
PurchTable purchTable;
PurchLine purchLine;
VendTable vendTable = VendTable::find("US_TX_007");
AxPurchTable axPurchTable;
AxPurchLine axPurchLine;
PurchFormLetter purchFormLetter;
;
//Create Purchase order
purchTable.initFromVendTable(vendTable);
axPurchTable = axPurchTable::newPurchTable(purchTable);
axPurchTable.parmPurchaseType(PurchaseType::Purch);
axPurchTable.parmDocumentStatus(DocumentStatus::PurchaseOrder);
axPurchTable.parmDeliveryDate(str2date("08/18/2014",213));
axPurchTable.parmAccountingDate(str2date("08/18/2014",213));
axPurchTable.parmPurchStatus(PurchStatus::Backorder);
axPurchTable.doSave();
purchLine.initFromPurchTable(purchTable);
axPurchLine = AxPurchLine::newPurchLine(purchLine);
axpurchLine.parmItemId("D0003");
axpurchLine.parmInventDimId('000458');
axPurchLine.parmPurchQty(10);
axPurchLine.parmPurchPrice(100);
axPurchLine.doSave();
//PO confirmation
purchTable = axPurchTable.purchTable();
purchFormLetter = PurchFormLetter::construct(DocumentStatus::PurchaseOrder);
purchFormLetter.update(purchTable, strFmt("Inv_%1", purchTable.PurchId));
// PO invoicing
purchFormLetter = PurchFormLetter::construct(DocumentStatus::Invoice);
purchFormLetter.update(purchTable, strFmt("Inv_%1", purchTable.PurchId));
info(strFmt("purchase order %1 invoiced",purchTable.PurchId));
}
Find,Display Method's
Find:
public static VendTable find(
VendAccount _vendAccount ,
boolean _forupdate = false,
ConcurrencyModel _concurrencyModel = ConcurrencyModel::Auto)
{
VendTable vendTable;
vendTable.selectForUpdate(_forupdate);
if (_forupdate && _concurrencyModel != ConcurrencyModel::Auto)
{
vendTable.concurrencyModel(_concurrencyModel);
}
if (_vendAccount != '')
{
select firstonly vendTable
where vendTable.AccountNum == _vendAccount;
}
return vendTable;
}
Display:
display public locality locality()
{
return VendTable::find(this.OrderAccount).Locality;
}
Monday, 23 November 2015
Friday, 20 November 2015
The Process For SalesOrder Creation, Class's & Table's Involved In the process
SlaesOrder Creation Process:
They are 4 Major Process Steps involved in the Creation Of Sales Order:
1. Confirmation.
2. Picking List
3. Packing Slip
4. Invoice.
They are 4 Major Process Steps involved in the Creation Of Sales Order:
1. Confirmation.
2. Picking List
3. Packing Slip
4. Invoice.
1. Confirmation : Class's & Tables That are related to Confirmation process are following:
Tables : CustConfJour , CustConfTrans.
Class's : SalesFormLetter_Confirm.
2. PickingList : Class's & Tables That are related to PickingList process are following:
Tables : WMSPickingRout , WMSOrderTrans.
Class's : SalesFormLetter_PickingList.
3. PackingSlip : Class's & Tables That are related to PackingSlip process are following:
Tables : CustPackingSlipJour , CustPackingSlipTrans.
Class's : SalesFormLetter_PackingSlip.
4. Invoive : Class's & Tables That are related to Invoice process are following:
Tables : CustInvoiceJour , CustInvoiceTrans.
Class's : SalesFormLetter_Invoice.
The Process For PurchaseOrder Creation, Class's & Table's Involved In the process
PurchaseOrder Creation Process:
They are 4 Major Process Steps involved in the Creation Of Purchase Order:
1. Confirmation/PurchOrder.
2. Receipt List
3. Packing Slip/Product Receipt
4. Invoice.
They are 4 Major Process Steps involved in the Creation Of Purchase Order:
1. Confirmation/PurchOrder.
2. Receipt List
3. Packing Slip/Product Receipt
4. Invoice.
1. Confirmation : Class's & Tables That are related to Confirmation process are following:
Tables : VendPurchOrderJour , VendPurchOrderTrans.
Class's : PurchFormLetter_PurchOrder.
2. ReceiptList : Class's & Tables That are related to ReceiptList process are following:
Tables : VendReceiptListJour , VendReceiptListTrans.
Class's : PurchFormLetter_ReceiptList.
3. PackingSlip : Class's & Tables That are related to PackingSlip process are following:
Tables : VendPackingSlipJour ,VendPackingSlipTrans.
Class's : PurchFormLetter_PackingSlip.
4. Invoive : Class's & Tables That are related to Invoice process are following:
Tables : VendInvoiceJour , VendInvoiceTrans.
Class's : PurchFormLetter_Invoice.
Wednesday, 18 November 2015
Changing the color of a row, using a condition in the grid:
- I created a new form with custtable data source.
- In the design node,added a grid with some fields(accountnum, custgroup, creditmax, cashdisc) .
- Override the displayoptions method in the custtable datasource.
public void displayOption(CustTable _CustTable, FormRowDisplayOption _options)
{
int myColor=WinApi::RGB2int(50,255,50);
;
//if(_CustTable.CreditMax <= 100100)
if(_CustTable.CustGroup == "30")
_options.backColor(myColor);
super(_CustTable, _options);
//CustTable_ds.research();
}
Once youn lookat the below pic you get clear idea.

dsdasddfgs fsdf

Links refers:
For more details
Wednesday, 4 November 2015
How to enable and disable fields conditionally in Axapta Dialogs
Similar to forms, to enable and disable the fields conditionally in Axapta dialogs, the following steps to be followed:
1. In the class, declare the dialog variable as ‘DialogRunbase’

2. Override the dialogPostRun method in the class as follows:
public void dialogPostRun(DialogRunbase _dialog)
{
;
super(_dialog);
_dialog.dialogForm().formRun().controlMethodOverload(true);
_dialog.dialogForm().formRun().controlMethodOverloadObject(this);
}
3. Assuming the dialog field as fld3_1, override/create the method as follows:

To summarize the same, the ItemGroupId is the (fld3_1) field. Upon selecting the value in this field, the Division field should get disabled


Deleting Transactions in Axapta
For deleting all the transactions in an Axapta company, in a quick way, the following steps to be followed:
1. Duplicate any existing company having data.
Administration--> Company Accounts --> Duplicate
2. Select the duplicated company.
3.Open SysDatabaseTransDelete class from the AOT.

4. Click on 'Yes' button from the 'Delete all transactions' window.

5. Export the company data in .dat and .def format from:
Administration -->Periodic --> Data export/import -->Default data --> Export
Such created .dat & .def files can be used for creating any new companies.
This way, we can have a company data without any transactions. Very helpful for creating new companies with setup data without any transactions.
1. Duplicate any existing company having data.
Administration--> Company Accounts --> Duplicate
2. Select the duplicated company.
3.Open SysDatabaseTransDelete class from the AOT.
4. Click on 'Yes' button from the 'Delete all transactions' window.
5. Export the company data in .dat and .def format from:
Administration -->Periodic --> Data export/import -->Default data --> Export
Such created .dat & .def files can be used for creating any new companies.
This way, we can have a company data without any transactions. Very helpful for creating new companies with setup data without any transactions.
Subscribe to:
Comments (Atom)